Saturday, 1 September 2012

Update 5

   Well, two years has passed since my last update and you may therefore think that nothing has happened with the restoration or that I am no longer involved with it - for whatever reason.
   Neither assumption is correct although it is true that progress has been very much slower than I had planned - do I hear a chorus of 'tell me about it!'.  As work in the garden is now getting less demanding, I intend to re-commence work on 1 September, and it's important that readers should be brought up to date with the progress - however small - during the last two years.
   An important milestone, putting all other achievements into insignificance, took place on 12 May this year when, using an ignition, cooling and battery lash-up, the engine ran for the first time since 1978!
   However, this was a short-lived run of only about twenty seconds.
   The setting-up of the twin SU carbs. consisted of the basic, initial positioning of the chokes and throttles as prescribed on the 50-year old instructions that I had obtained from the SU stand at an Earl's Court Motor Show in the early 1960s and I initially thought that incorrect setting was the reason for the problem.
   The AC Delco fuel pump had been stripped, cleaned and re-assembled using the old diaphragm and valves as I could not see any fault with them.  However, as all my other investigations into timing, ignition coil operation, distributor points gap and the carb. settings lead nowhere, I had to conclude that the pump components were at fault.
   I was pointed in the direction of a likely supplier of a refurb kit and one eventually arrived.  After fitting the new diaphragm - I've no idea if it it subject to attack by the modern petrol that I am using - and also the two valves, even though I could see nothing wrong with the originals dating from the 1970s, I prepared the lash-up again, pushed the bodyless car outside the garage, primed the carbs - the priming lever on the pump is very useful - and applied 12 volts to the starter motor and ignition circuit.
   The engine started first time and continued running without problem for the next 25 minutes whilst the engine flushing oil did its job.  I had also put flushing oil into the gearbox and, as the prop. shaft is not yet connected, was able to select the gears without difficulty and so check that nothing untoward had taken place inside the box.
   Draining it and the sump while the oil was hot was the next task and then I noticed that coolant was coming out of the cap on the header tank.  Examination showed that during the rebuild of the radiator, the top (two-inlet) connector had been re-aligned.  The result was that the hose connecting to the header tank was lower than that connecting to the thermostat housing and so an air blockage was created in the housing.
   I have now fitted a domestic heating radiator bleed valve to the brass nut on the top of the housing.
   The work that has been completed over the last two years includes the obvious re-fitting of the power train, a stainless steel exhaust box (again routed under the driving seat as I always had difficulty in finding a route to the rear of the car, for the pipe and box, that did not invite damage on our local country roads), fitting new, copper, brake and clutch piping, drilling a breather hole in the top bolt of the axle differential box and checking out the complete wiring loom before applying replacement binding tape.
   Checking for lubrication and hydraulic oil leaks will be my first task and then I shall tackle the production of a new, fibre-glass passenger floor.  The original marine ply floor had been replaced with a sheet metal version in the early 70s but proved to be incapable of further use when the car was dis-assembled.  I have not yet decided whether to fit a foot-pan as per that on the driving side floor - it may not be worth the effort!
   So, watch this space!

Sunday, 8 August 2010

Update 4

A lot has happened - but not as much as hoped-for - since Update 3.

The new dampers arrived but two problems became obvious immediately. Firstly, the loop-to-loop dimension was incorrect and the dampers would, if fitted, have lowered the car. Secondly, the original damper springs did not fit onto the new dampers. The solution was to return the dampers for replacement with ones of correct length and also to have appropriate springs fitted by the damper supplier. This meant supplying a front and rear spring as samples for spring compression rate verification because, although the original kit assembly instructions specified which two of the four shock absorbers were to be fitted to the back axle, information on other aspects of the damper/spring assembly were, unfortunately, never supplied.

When the springs were removed, it was found that those for the rear axle were 0.5 inch longer than those for the front suspension - not a serious problem apparently, but something unexpected and without a known reason. It seems that there was a connection between the different lengths and specifying which units were to be fitted to the rear axle!

When the front brake shoes were delivered, they were the wrong size (incorrect information used) and so the old metals had to be re-lined - more expensive than new shoes!

On the rear trailing arms, all the rubber in the bushes had perished but it was possible to obtain over-length bushes of the correct internal and external diameters and to have them reduced in length before being pressed into the arms.

The replacements for the corroded outriggers and sidebars on the chassis were obtained from the Club Registrar so that work could start on repairing the chassis. However, as all of the above problems coincided with the arrival of our son and his family on holiday from New Zealand, serious doubts about the planned project completion date began to emerge.

The chassis had multiple corroded areas - the front outriggers,
the siderails, the rear outriggers and a section of the angle-iron
holding the upper loop of the O/S front shock absorber.

The chassis was prepared for collection by the welder but in order for an effective removal of rust to allow for repairs, all the old underseal had to be removed beforehand using an electric paint stripper and scraper - a long and dirty job for which the only saving grace was that the greater part of the chassis metalwork had been protected over the years.

After the collection of the chassis came the opportunity to start refurbishing activities and as all the relevant parts were available, a start was made with the cleaning and painting of the back axle (Standard 10 in origin) and the fitting of new slave cylinders, dust covers and brake shoes.

Note the photo of the brake drum details prior to disassembly
- important if it is likely that a delay will occur before reassembly.

From a contact in The Standard Motor Club, details of a firm that supply replacement bushes for the steering idler link were obtained - rubber is not used in the bushes and a longer life is claimed. The contact also offered to provide the use of a flypress to insert the new bushes - an offer that could not be ignored.

Things are now starting to happen but August 15th, the date of the Fairthorpe Gathering, marking the 50th anniversary of the founding of the Club, is less than one week away and although the repaired and painted chassis has now been returned, there is no chance of getting very much replaced before then.

Sunday, 13 June 2010

Update 3

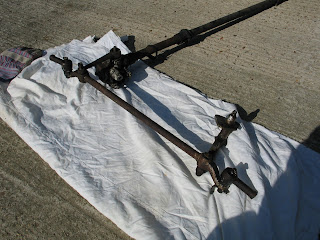
No mention has been made of the other steering gear problem - that of removing the old bushes from the centre arm.
When an attempt was made to remove the bush at the end of the steering arm, no amount of persuasion, gentle or otherwise, was successful despite the use of a variety of tools that should have done the trick.  The next option was to remove the steering arm from the steering box shaft that is splined and conical.
The question was, was removal of the arm necessary?  The answer had to be 'yes' because the arm position did not allow the steering wheel to be aligned correctly unless the track rods were adjusted to have unbalanced lengths.  This imbalance was about 0.75 inches (about 20mm) and did not follow the Fairthorpe guidelines of being of an equal length although we have since learned that none of the EMs achieved such a result!  The length imbalance can be seen below.

It is obvious that unbalanced track rod lengths will affect the steering lock and so the decision had to be - remove the steering arm and then it can be replaced in such an angular postion that track rod length balance can be achieved.

Like the bush that could not be removed, the steering arm refused to budge and so the decision was made to seek the services of a local motor engineering firm having a good reputation as well as the requisite equipment.  The complete steering assembly was removed and then returned with all bushes and the arm removed.


Problem solved?  Yes and no because removal of the arm revealed that the shaft/arm junction was not a simple splined cone that would have allowed an incremental angular adjustment of the arm but also included four wider and deeper splines that effectively limited angular adjustment to 90 degrees thus giving only one position that was useable.
Two of the four splines can be seen on the image, one in line with the hole on the threaded part of the shaft and the second 90 degrees clockwise from it.

Update 2

Here is an image of WEW 707 in June 2009 after being neglected since 1978!
In fact, some remedial work had been done as the tyres and inner tubes had been replaced to allow the car to be moved.
The badge has been removed as some of the enamel had flaked off.  Strange to relate, the enamel, when the badge was installed in 1959, was white but when a replacement was obtained, the enamel was blue and we were told that all the Fairthorpe badges were blue!
This year, as soon as the cold weather started to give way to something more in keeping with car restoration, the hydraulics were tackled and the first setback was that when an attempt to remove the slave cylinders (two per front brake) was made, it was found that the unions behind the front brakes were locked solid.  This resulted in damage to the Bundy tubing when the unions were eventually removed using equipment more powerful than the usual spanners - additionally, although large amounts of underseal mastic had been applied to all rust-prone areas of the car, some of the tubing showed signs of  rust.
It was decided that it was unsafe to re-use any of the original hydraulic tubing and that copper piping would be used instead.  After the tubing at the front of the car had been removed and equivalent length replacements, complete with the appropriate new unions, had been obtained, it was found that the unions would not screw into the slave cylinders, etc.  This was an easy mistake to make as visual comparison of the old and new unions did not indicate that they were different - unions with the correct threads have now been fitted.
It was not a surprise to see that the rubber/metal bushes on the steering centre arm had deteriorated and were not up to the MOT, or our, standards of safety and reliability.  The car reputedly has a Standard 10 steering box and other steering components except for the idler arm bracket that is an in-house Fairthorpe product.  As no information on sources of replacement bushes resulted from my posting on the FSCC website message board, I posted a request in the Standard Motor Club for information.
The result was the name of a company in Tamworth, Staffordshire that makes replacement bush/pin units that do not use rubber and so have a likely longer life.  Not only that, but the informant is local to me and has offered facilities for pressing the new bushes into the centre bar!  That's one problem resolved.

Friday, 21 May 2010

Update 1

The first modification to the car - see the first image following 'How it all started' - consisted of adding a pair of Perspex water deflectors that were attached to the windscreen frame. The design was based on the wind deflectors that could be bought for production cars - these allowed the front side windows to be open without creating a draught for the occupants.

The sidescreens on the EM did not fit particularly well so rain entry was a constant problem. The deflectors worked well but with the hood and sidescreens off, there was the danger of losing an eye when getting into and out of the car. To be honest, there were not many occasions when the car was driven with the hood off unless we undertook a +3 hour journey on a fine day. Taking the hood and sidescreens off was an time-consuming chore for short journeys such as shopping and commuting.

The second image shows the modification that allowed the boot space to be more useful. Instead of resting the spare wheel on top of the petrol tank, it was lowered into the space in front of the tank and the resultant excess height that prevented the boot lid from closing was eliminated by a localised lowering of the boot floor. This resulted in a bulge - in which the wheel sat - under the tail of the car.

The result was satisfactory apart from the bulge touching the hump on some of our rutted Essex country roads and eventually the resultant damage persuaded me to remove the modification.

The car was used as our only means of transport until our first child arrived and it then became less frequently used but the arrival of another child and my wife now driving meant that the EM was again in full use for my commuting.

This continued until a major refurbishment, including a new hood and screens, became necessary in the 70s. The hood was not as efficient as the original and the new version of the water-deflecting 'flap' that was meant to prevent the entry of the rainwater that was driven up the windscreen proved to be completely useless.

The rainwater problems, plus the deterioration of the petrol tank that produced a regular blockage of the petrol pump - despite fitting a filter in the fuel line - became unacceptable and the EM was taken off the road in late 1978.

It then languished under plastic covers in various parts of the garden until being put under partial cover in the late 1990s where it remained until June 2009.

Wednesday, 19 May 2010

How it all started

In mid-1959, we decided to spend a precious few hundred pounds on the purchase of a kit car.
Although our car at the time was a 1938 MG TB, we were not involved in trials, hill-climbing and the like and used it only for social and commuting activities.
The MG had, however, developed a crack between the valve seats in one cylinder and in view of its age and the real possibility of further problems plus our need to have a car that met our reliability, comfort, sportiness and, very importantly, our economic requirements, we decided to purchase a FAIRTHORPE Electron Minor 1.
For readers who are unfamiliar with the then current tax system, Purchase Tax (the forerunner of VAT) was not charged - in our case, a major factor - if the assembly of the car was carried out by the purchaser. The basic cost of the kit was £503 but if bought assembled, the cost rose to £713 14s 2d or £713.71!
After delivery (costing just over £10!) in a BR road/rail container to a local pub that had a large lock-up garage for hire, we set to work and, with the occasional assistance of my father-in-law, had the car on the road in just over a month of evenings and weekends.
Digital cameras were still many years away in 1959 and although we had a 35mm Kodak Retina 1A (another blast from the past), we did not find the time to take photos - much to our later regret.
The earliest photos we have were taken in 1961 when the car was nearly two years old. Two major modifications had been carried out by then and these can be seen in the photos that follow.

1961 - image 1

1961 - image 2

Followers

About Me

Chartered Engineer (Retd). Interests are Family History and a 1959 self-build sports car.